Deploy to Azure
Azure Requirements
An Azure subscription. If you don’t have one, create a free account
An Azure resource group to deploy the resources into
An Azure Virtual Network (vNet) with at least two subnets:
- An “outside” subnet for the appliance to connect to the Trustgrid control plane and data plane gateways, and accept incoming connections if the Azure Trustgrid appliance will be acting as a data plane gateway
- An “inside” subnet for communicating with other virtual machines and services within the Azure vNet
- (For Clustered Appliances) An Azure routing table associated with the “inside” subnet.
Azure Extension Conflicts
- Azure Backup - Like most network virtual appliances the Trustgrid appliance does not support being backed up using Azure Backup. The act of taking a snapshot with Azure Backup will disrupt appliance operations and may cause data plane disruption and cluster failovers.
- Defender for Servers - The Trustgrid appliance OS is a minimal hardened Linux distribution. Installing Defender for Servers or similar endpoint protection software on the appliance may cause system instability and is not supported.
VM Requirements
| Requirement | Description |
|---|
| Disk Size | At least 30 GB |
| Interfaces | - 1 Public with a Public IP address
- 1 Private
|
| CPU & RAM | See Instance Type below for recommendations |
Instance Size
Trustgrid has validated using the B-series burstable - Azure Virtual Machines instance type.
VPN throughput is tied to CPU the recommended size depends on roles, expected throughput.
- For Gateway nodes expecting up to ~200Mbps throughput, Trustgrid recommends the Standard_B4ms or larger
- For Edge nodes expecting less than 100Mbps throughput, Trustgrid recommends the Standard_B2s or Standard_B2ms or larger
Interfaces
One WAN interface with a public IP and one LAN interface on a private subnet. The nodes will need to be able to route to all required hosts/applications that need to communicate across the Trustgrid virtual network.
The LAN interface needs to have IP Forwarding Enabled in order to forward the traffic across the tunnel.

See Azure virtual network traffic routing.
Supported Regions
The Trustgrid official community image, trustgrid-node-2204-prod, in the public gallery trustgrid-45680719-9aa7-43b9-a376-dc03bcfdb0ac is currently published in the following regions. If you need to deploy in another region, please contact Trustgrid support. If you are not a direct customer of Trustgrid, please check with your vendor that is utilizing Trustgrid to have them contact support.
| Region Display Name | Region Name |
|---|
| East US | eastus |
| East US 2 | eastus2 |
| Central US | centralus |
| North Central US | northcentralus |
| South Central US | southcentralus |
| West US | westus |
| West US 2 | westus2 |
| West US 3 | westus3 |
Network Access
For gateways:
- Outbound internet access to the Trustgrid control plane networks and ability to resolve public DNS names.
- Inbound access required is the TCP port defined for the Trustgrid gateway service to listen on. Edge nodes will connect to the gateways public IP and port defined. The default port used is 8443.
For edge nodes:
- Outbound internet access to the Trustgrid control plane networks, outbound access to the IP and ports of the Trustgrid gateways, and ability to resolve public DNS names.
- No inbound access is required on the public interface.
For all clustered nodes:
- The cluster heartbeat runs on the LAN/inside interface on TCP Port 9000. This port will need to be open between both Trustgrid Gateways for failover to work correctly.
Other VM Requirements
Deployment Process
One of more Virtual Machines will need to be deployed into the target Azure subscription to act as the Trustgrid nodes using the official community image. Then the remote registration process can be used to activate the nodes in the Trustgrid portal.
Participants
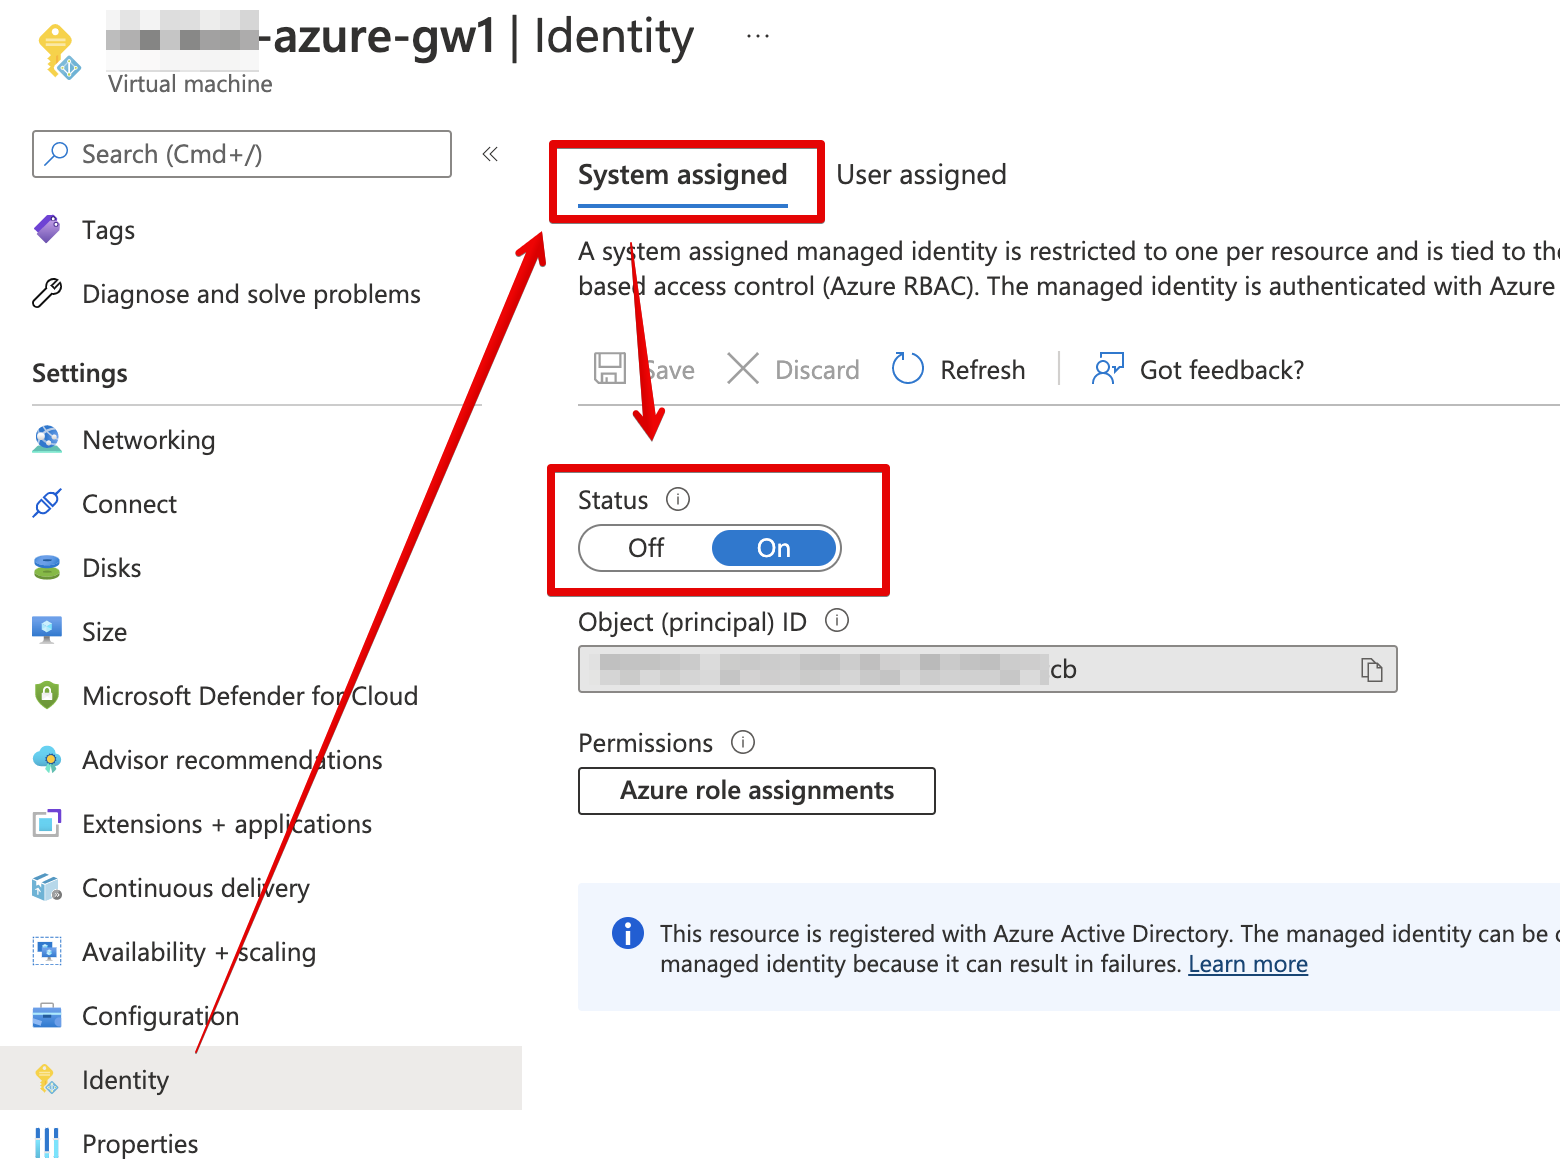
- Site Tech - User(s) with permissions and skills to deploy new instances in Azure, create the required Managed System Identity shown above, and make changes in Azure to allow the required network connectivity
- Trustgrid User - User with permissions to Activate nodes in the Trustgrid portal (or API)
If the Site Tech is not part of the organization that is a Trustgrid’s direct customer, Trustgrid’s professional service team will need documented approval from that customer before proceeding with assisting in the deployment.
High-Level Process
- The Site Tech should be able to complete the following steps independently:
- Build out prerequisite resources including Resource Groups, vNets, subnets and routing tables in Azure
- For single node deployments:
- Create VM Instances based of the official Trustgrid community image
- For clustered deployments:
- Create a routing table for the in LAN interface subnet if it does not already exist
- Create two VM Instances based of the official Trustgrid community image
- Create the Azure IAM role as defined above
- Use the Azure VM Serial Console to start the registration process, this code then needs to be communicated securely to the Trustgrid User.
- Trustgrid Tech -
- Activate the device with the target organization
- Confirm healthy functionality and connectivity to the required gateways
- Configure the nodes as needed (e.g. clustering, VPN, L4proxy)
Deployment Methods
- Deploy via Azure command line tool
- Deploy with Bicep Modules - This is a collection of Bicep modules that can be used to deploy Trustgrid nodes in Azure. It includes modules for deploying the virtual machines as well as creating IAM roles and networking resources.
- Deploy with Terraform - This is a collection of Terraform modules that can be used to deploy Trustgrid nodes in Azure. It includes modules for deploying the virtual machines as well as creating IAM roles and networking resources.
High Availability
Trustgrid supports two methods for supporting high availability networking connectivity via clustered Trustgrid nodes in Azure. These methods can be used together or independently.
| Method | Description | Common Use Cases |
|---|
| Route failover | Publishes routes to the Azure route table associated an interface or specified route tables. Automatically adjusts the Next hop IP address to point to the active node. | - Environments with only a few route tables that need to be adjusted
|
| IP failover | Assigns a floating IP address to the interface of the active Trustgrid node. | - Environments with many route tables.1
- Environments using Azure Virtual WAN.
- Using connectors on the Azure cluster.
|
1 Route based failover requires the nodes to have correct Azure permission to modify each route table. Environments with many route tables would have to grant permission to the containers (resource groups, subscriptions) for each table which makes maintaining least-privilege access difficult.
Details how to deploy a Trustgrid appliance and related resources using the Azure CLI (az) commands.
IP Failover for Azure appliances
Route failover for Azure appliances