The WAN interface of a Trustgrid node is used to build connections to both the Control Plane and any Data Plane connectivity. Any change to this IP address is disruptive and presents a risk that the device will go offline if incorrect information is provided. This could potentially require a technical resource to go onsite to reconnect physical devices.
To make the below changes via the Trustgrid portal the user must have the Node Administrator or Administrator role.
The node must also be connected to the Trustgrid Control Plane to make this change via the portal.
The document details the process of updating the ETH0 - WAN Interface IP via the Trustgrid portal. This change can also be performed via the Trustgrid LocalUI .
WAN IP Change - Try Method
Trustgrid nodes have the ability to test a new IP configuration before permanently applying the configuration to the device. The process works like this:
The user will enter the new IP configuration into the portal and click Try
The user will select the duration to try the new configuration (10, 30 or 60 minutes)
If the device successfully reconnects to the control plane after the select time the user will have the option of importing and saving this new configuration permanently, or reverting to the previous configuration.
If the device does not reconnect within the chosen duration, the device will automatically revert to its previous IP address configuration.
The device will revert to the original IP if it is rebooted or power cycled after initiating the “try” option and before importing and saving those changes in the portal.
Changing WAN via Try - Detail Process
Login to the portal and navigate to the Node that you wish to reconfigure.
Confirm the node is actively connected to the cloud
Note: If the device is not online when the below IP change is made it cannot pull this config from the device. Until it reconnects to the cloud it will continue using the original IP address.
First confirm there is a green dot next to the node name
Control Plane Connectivity is green
Confirm that you can open an interactive tool such as Terminal. Leave this tool open so you know it when the device disconnects after applying the change.
Navigate to the Configuration > Network section and confirm Network Adapter 1 - WAN Interface is selected.
ETH0 - WAN Interface
Set the IP settings to the desired new configuration
IP Configuration Settings
Scroll down and select TryTry Button
Select the duration of time the device should be allowed to be disconnected before reverting to the prior IP configuration and click ConfirmApply Confirmation.
A warning will be presented notifying of the risks of changing the IP address. You will need to type in the word yes to confirm.
At this point the device will apply the new IP address and attempt to reconnect.
Notification that the device is applying the settings
This would be the point update the node’s connectivity, either physically by moving a cable or logically by updating the connected switch port config, so that the new IP address can connect the device should come back online.
This must be completed before the duration expires.
If the device cannot connect for the chosen duration the settings will revert to the original IP settings.
If the device successfully reconnects:
Refresh the page. You will be presented with the below options.
Import/Revert prompt
Import - This option will update the portal to show the new IP address information.
Revert - This option will revert the portal to show the original IP address information.
Select the desired option and then scroll down and select Save. Again you will be prompted to confirm the change.
Some older versions of the appliance software may require you to restart the node service after saving the import/revert settings.
WAN IP Change - Save Method
This process is very similar to the above with the exception that the change is permanent. The device will continue to use the configured IP address until either:
The device connects to the cloud using the newly saved IP, at which point this process or the above Try method can be used to reconfigure the IP remotely
The device is reconfigured locally using either the Trustgrid Local UI or console (contact Trustgrid Support)
Changing WAN via Try - Detail Process
Login to the portal and navigate to the Node that you wish to reconfigure.
Confirm the node is actively connected to the cloud
Note: If the device is not online when the below IP change is made it cannot pull this config from the device. Until it reconnects to the cloud it will continue using the original IP address.
First confirm there is a green dot next to the node name
Control Plane Connectivity is green
Confirm that you can open an interactive tool such as Terminal. Leave this tool open so you know it when the device disconnects after applying the change.
Navigate to the Configuration > Network section and confirm Network Adapter 1 - WAN Interface is selected.
ETH0 - WAN Interface
Set the IP settings to the desired new configuration
IP Configuration Settings
After setting the IP address, click Save.
Save Settings
You’ll be presented with a warning like the below. Type yes and click Confirm.
Apply Confirmation
The device will be notified it has an updated configuration. It will pull this configuration down and automatically restart the Trustgrid service using the new IP address.
The restart usually takes less than a minute.
Whatever interactive service you were using (Terminal, etc) should disconnect.
After the local site networking is updated (either physically by moving a cable, or logically by updating the connected switch port config) so that the new IP address can connect the device should come back online.
Additional Post-IP Change Verification
After the WAN IP has been changed there are a few areas where the WAN interface IP may have been used:
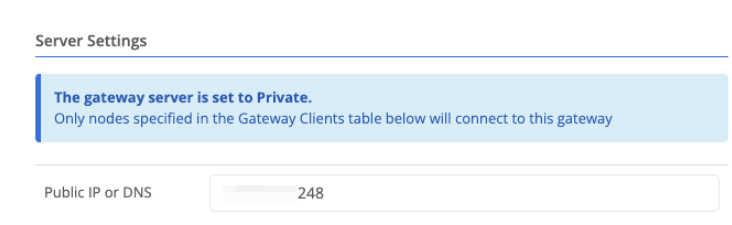
Gateway Nodes
If the Trustgrid node is acting as either a public or private gateway, you may also need to update the Public IP field under System -> Gateway -> Server Settings. If your gateway is using DNS instead you will need to update that DNS record accordingly.
Clustered Nodes
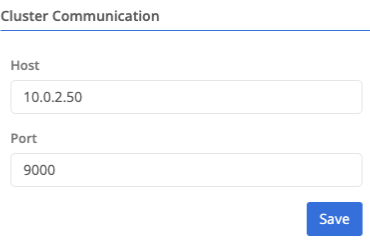
If the Trustgrid node is clustered and the WAN interface IP was being used for the cluster heartbeat you will need to adjust the IP address it is listening.
The heartbeat IP and port is visible under System -> Cluster of each cluster member’s node detail page.
If the Host field is using the old WAN interface IP address, change it to the new IP and click Save.
If the nodes has two or more interfaces, it is typical that those LAN interface IPs will be used for the cluster heartbeat. In that case no change is required on this page.